Thursday, December 31, 2015

Modern Double Cross {a finished quilt}

This is the year of finishing things.  According to my blog history this quilt was imagined and started in February 2014 in the form of a tutorial for both 12 and 6 inch blocks for my turn as queen bee of We Bee Learning.  My cousin was graduating from High School that spring and I needed a quilt.


The blocks quickly came pouring in from across the country and, with the addition of a few more on my end, were ready to be pieced into a top by May.  Since the colors were so saturated I really felt like they needed breathing room, plus my cousins on this size are very tall and I didn't want to make 1000 blocks, so I played with some alternative layouts,
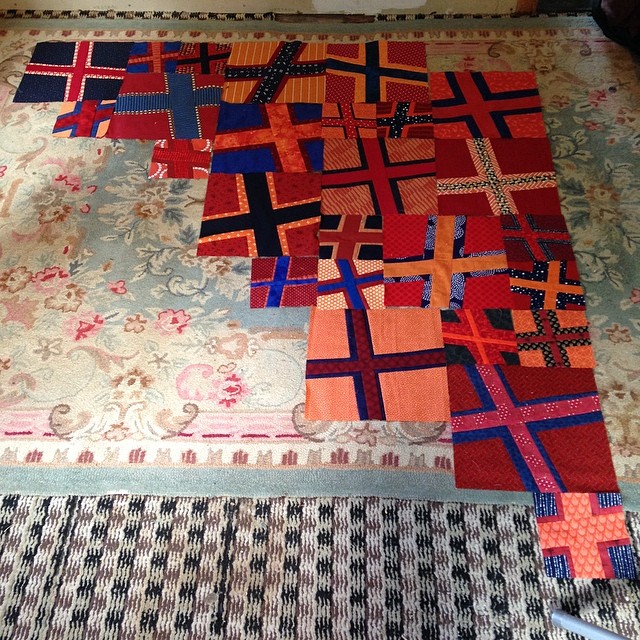


Once I had decided I bought the background fabric, going with a basic extra-wide blue and started to work out the piecing.  This was my first adventure into using an alternative layout so it was definitely challenging for me.  I eventually ran out of background fabric, purchased some more, and then it sat.  I'm not sure why.  Maybe I was overwhelmed with the though of trying to piece the whole thing together?  Maybe it was because it's simply larger than any of the rooms in my house so I didn't have a place to lay it out and work on?  Finally when I went on retreat this fall I brought it with me, hoping that would give me the kick I needed to get it finished.


Well I was right.  I found a big room, figured out how I had intended to put it together, and got to work FINALLY sewing the top together.  I had some much needed help squaring it up and learned some great techniques (the trick is to make the flooring work for you!) and it was ready to ship to the longarmer.  


Katie at Home Hearth Quilting did a fabulous job on it, quilting a fun bubble feather pattern on the blue background and crosses to echo the piecing through the orange and red.  She even added in a special quote for my cousin, who is studying music.

"Do not fear mistakes, there are none." - Miles Davis

Being a teenage male he was tough to read but I think he liked it. :) 


I gifted the quilt at our family Thanksgiving this year and promptly put him and his brother (both of whom are 6ft+, to work holding it for me for pictures.  This quilt finished at 107" x 96" so I really needed their help to get some pictures!


Nearly two years after it had begun, I was really glad to get this one finished.  Another WIP crossed off the list and happily received.  Linking up with Needle and Thread Thursday and Finish it up Friday.


Saturday, December 26, 2015

Best of Never Just Jennifer {five posts from 2015}

The lovely Cheryl at Meadow Mist Designs is hosting a fun end of year link-up highlighting your best content of 2015.  This year has been absolutely crazy for me.  I started right out of the gate with a strong January, almost doubling my blogging schedule and sewing schedule.  Life does have a way of getting busy though and I tailed off at the end of the year, really slacking in October and November particularly.


#1  Round Trip Quilts:  

My favorite project by far this year was working on the Round Trip Quilts round robin bee.  I got my quilt back in September and it's absolutely amazing.  I haven't had a chance to photograph it yet to share with you but fear not, it will be done.  I loved seeing the instagram/blog posts of when these amazing talented ladies received their tops.  I can't wait to see the finished quilts start popping up.

Some of my favorites to work on were:


#2  Two Birds, One Stone:

This is by far the quilt I'm most proud of this year.  I sleep under it every night and bring it with us when we travel.  My husband even likes it!  I put a lot of work into designing and thinking out this quilt pattern and could not be happier with the final result.  I still need to work out how to write up a pattern for it thought.  :)  You can see all of the posts related to this project here.


#3  Oakshott Scandinavia Challenge: 

This quilt was made a part of a challenge with Sew Mama Sew and Oakshott Fabrics, using their Scandinavia collection.  I loved the opportunity to make something that honors my family heritage and reminds me of the memories I made when I visited Finland as a girl.


#4  Twice as Nice Superhero Quilts

These matching quilts were made for a coworker who had twin boys in November.  They were really fun to make and I found it challenging to make these matching quilts different enough for the twins.  You can see just the tops here and the finished quilts here. 


#5  In Memory of, #1

This was by far the most challenging project of 2015.  I was commissioned to make two memory quilts using the clothes of my customers parents.  This first quilt was for her brother.  In the end, I'm happy with how it came out but have to admit that the whole thing was a challenge.  I struggled to find motivation to work on this quilt and really had to push myself through each step to get it finished.  I'm starting on the second quilt soon and hope that I can take away some of what I learned from the first time around.


Thank you for following along as I reviewed my best of 2015 posts.  I hope you'll take the opportunity to reflect on your best of as well!


Thursday, December 17, 2015

Carpenter's Star {a finished quilt}

This quilt has been a long time in the making.  It began in early 2013 when I found out that my uncle was getting married and was born out of my strong desire to make a carpenters star quilt.  I queried my uncles then soon-to-be wife and we settled on a red and white color scheme.  Without delay I started buying up every red or white fabric I found on the internet, not really thinking about theme or overall composition.  Keep in mind I didn't have a stash yet so to make a scrappy carpenters star I needed fabric.  Since it's hard to tell what color red a fabric is online, the reds in this quilt vary from pink and peach to burgundy and orange.  Because of my buying fervor there are some really interesting fabrics in this quilt.  Some of my favorites include:

  • red and white zebras
  • balloon dogs
  • cutlery
  • "How to iron a shirt" fabric
  • coloring book animals
  • Pi and the angles of a triangle

I cut without a plan too.  I knew I needed to make half-square triangles so I started cutting ALL of the fabrics I had bought into 10" squares.  Then I sewed them into HST using the biggest, widest seam you can imagine.  This was before I knew was a 1/4" seam was.  The large seam resulted in blocks that were roughly 7", give or take an inch....more or less.  I wasn't big on consistent sizing yet either I guess.  Either way, the top came together fine.  


I added three borders to the top to bring the size up to just under queen sized.  One dark solid red, a 1 inch solid white, and then an red plaid to take it from square to rectangular.  I didn't actually get a measurement on it before gifting.  Let just leave it at "large cuddle couch quilt" / "small queen bed quilt" sized.  I used the same red plaid on the back, but again, I wasn't big on measuring so I had to supplement with the excess red blocks I had cut and a pieced heart using scraps from the front.  Personally, I really love the back of this one.  The splashes of extra color make me pretty happy.


Originally I wanted to quilt this myself but the size of it was overwhelming to me.  I made the decision and had it long-arm quilted locally.  This is one of the reasons that the quilt took so long to make.  When I got the quilt back I was really unhappy with the quilting.  It was not what we had discussed when I dropped off my quilt, whole blocks were not quilted and the wrong thread color had been used.  At that point I didn't know what to do so the quilt just sat for literally years needing only a binding.  


Finally I decided that it wasn't worth it to take the quilt back and have it re-quilted.  I certainly didn't want to rip all of those stitches out and frankly, didn't trust the long-armer to do it.  So I sucked it up, cut a binding, and finished it in time to gift at our family Thanksgiving this year.  And I'm glad that  I did.  They loved it, even though it was two years late, and were so excited to get a quilt.  And to be honest, I didn't even notice the quilting when I gifted it and I don't notice is now in the pictures either.  I guess I just needed an expectation adjustment.  After all, Finished IS better than Perfect.


Remember that pile of squares that I cut at the beginning?  Some of them became my Sailor's Take Delight quilt that I finished and gifted this summer.  


Wednesday, November 25, 2015

Open Wide Zipper Pouches, take two

I have been on a role since I got back from retreat in October.  I guess all I needed was a little extra time with my creativity and others like me to really get my sew-jo back.  This Sunday I worked on making a bunch more of the Open Wide Zipper Pouch by Noodlehead.  I made my first one back in May of this year and have been using ever since.  I love it so much and I thought that they would make great gifts this year (although to be perfectly honest my ulterior motive was to make more for me! Don't tell anyone.).


I have a bunch of canvas fabrics that I have been wondering what do do with for ages.  I found them again when I was cleaning out my sewing room post-retreat and left them out on the table figuring I'd make a bag or something.  on Sunday, I was having some trouble with the thread tension on a baby quilt I was quilting so I set it aside, picked up these fabrics and just started cutting.


The first fabric I used is Itsy Bitsy, by Heather Ross, which you can still find here.  The other is a fun records print by Melody Miller called Ruby Star from Spring 2012 for Kokka on an 85/15 cotton linen blend.  I have the color ambrosia, which is a lovely sage-mint green.  This is a really large scale print with the records measuring almost 7" across.  I made three pouches in these fabrics, one large in the records and one medium and one small in the the Itsy Bitsy.  I used a heavy weight Pellon fusible interfacing on all of these bags because I like them to have a little more structure and substance and I think they hold up better personally.  Overall, the added weight/bulk didn't impact my sewing.  They are also all lined with the same grey-brown Moda Grunge as my first pouch; perfect for hiding stains.


The second versions that I made are using a fun black and white forest animal canvas, that I think came from Spoonflower, and Essex Linen for the bottom.  I'm pretty sure the color I used is either Graphite or Black.  I made two large pouches and two medium pouches in this combination I love on these how the only color comes from the zippers.  I switched up the colors using various bright zippers.  Aren't they fun?!


My personal favorite is this Bear Boogie in Red by Kokka, a cotton linen blend.  I have no idea where I got this fabric but since it's just so darn cute I'm glad it ended up in my stash some how.  I only made one large pouch out of this one but would love a little set of them to use.  This one isn't completely done yet, I still have to sew the tag to the end of the zipper, but I was so excited to use it that I decided to do that part later.


While cutting/piecing this one I tried to make sure that all of my seams would line up around the bag  and was so pleasantly surprised when I flipped in right-side out and saw this perfectly matched seam!


I still have a few more to finish up before these are completely done.  And they're so fast and easy I might just cut out a bunch more for gifts and to list for sale sometime.  I think a fun modification would be to use laminate fabric for the inside for shower supplies or things that might leak.  I'll have to explore that further too.


Linking up with WIP Wednesday today over at Freshly Pieced.