Showing posts with label finish it up friday. Show all posts

Thursday, December 31, 2015

Modern Double Cross {a finished quilt}

This is the year of finishing things.  According to my blog history this quilt was imagined and started in February 2014 in the form of a tutorial for both 12 and 6 inch blocks for my turn as queen bee of We Bee Learning.  My cousin was graduating from High School that spring and I needed a quilt.


The blocks quickly came pouring in from across the country and, with the addition of a few more on my end, were ready to be pieced into a top by May.  Since the colors were so saturated I really felt like they needed breathing room, plus my cousins on this size are very tall and I didn't want to make 1000 blocks, so I played with some alternative layouts,
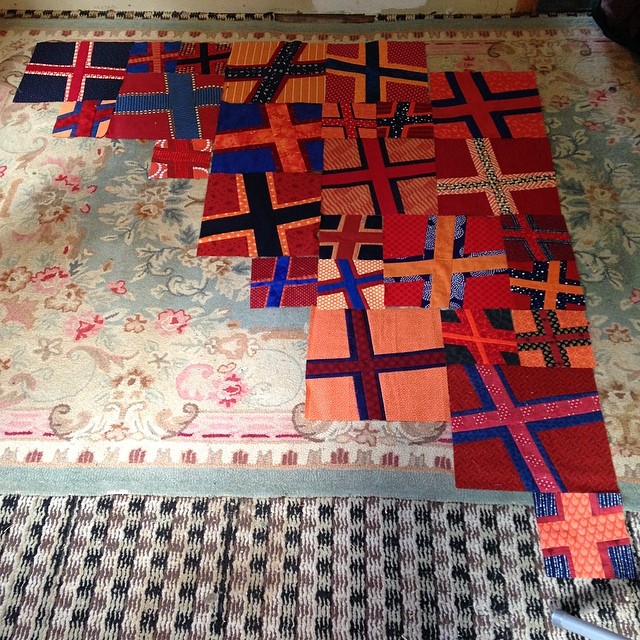


Once I had decided I bought the background fabric, going with a basic extra-wide blue and started to work out the piecing.  This was my first adventure into using an alternative layout so it was definitely challenging for me.  I eventually ran out of background fabric, purchased some more, and then it sat.  I'm not sure why.  Maybe I was overwhelmed with the though of trying to piece the whole thing together?  Maybe it was because it's simply larger than any of the rooms in my house so I didn't have a place to lay it out and work on?  Finally when I went on retreat this fall I brought it with me, hoping that would give me the kick I needed to get it finished.


Well I was right.  I found a big room, figured out how I had intended to put it together, and got to work FINALLY sewing the top together.  I had some much needed help squaring it up and learned some great techniques (the trick is to make the flooring work for you!) and it was ready to ship to the longarmer.  


Katie at Home Hearth Quilting did a fabulous job on it, quilting a fun bubble feather pattern on the blue background and crosses to echo the piecing through the orange and red.  She even added in a special quote for my cousin, who is studying music.

"Do not fear mistakes, there are none." - Miles Davis

Being a teenage male he was tough to read but I think he liked it. :) 


I gifted the quilt at our family Thanksgiving this year and promptly put him and his brother (both of whom are 6ft+, to work holding it for me for pictures.  This quilt finished at 107" x 96" so I really needed their help to get some pictures!


Nearly two years after it had begun, I was really glad to get this one finished.  Another WIP crossed off the list and happily received.  Linking up with Needle and Thread Thursday and Finish it up Friday.


Thursday, December 17, 2015

Carpenter's Star {a finished quilt}

This quilt has been a long time in the making.  It began in early 2013 when I found out that my uncle was getting married and was born out of my strong desire to make a carpenters star quilt.  I queried my uncles then soon-to-be wife and we settled on a red and white color scheme.  Without delay I started buying up every red or white fabric I found on the internet, not really thinking about theme or overall composition.  Keep in mind I didn't have a stash yet so to make a scrappy carpenters star I needed fabric.  Since it's hard to tell what color red a fabric is online, the reds in this quilt vary from pink and peach to burgundy and orange.  Because of my buying fervor there are some really interesting fabrics in this quilt.  Some of my favorites include:

  • red and white zebras
  • balloon dogs
  • cutlery
  • "How to iron a shirt" fabric
  • coloring book animals
  • Pi and the angles of a triangle

I cut without a plan too.  I knew I needed to make half-square triangles so I started cutting ALL of the fabrics I had bought into 10" squares.  Then I sewed them into HST using the biggest, widest seam you can imagine.  This was before I knew was a 1/4" seam was.  The large seam resulted in blocks that were roughly 7", give or take an inch....more or less.  I wasn't big on consistent sizing yet either I guess.  Either way, the top came together fine.  


I added three borders to the top to bring the size up to just under queen sized.  One dark solid red, a 1 inch solid white, and then an red plaid to take it from square to rectangular.  I didn't actually get a measurement on it before gifting.  Let just leave it at "large cuddle couch quilt" / "small queen bed quilt" sized.  I used the same red plaid on the back, but again, I wasn't big on measuring so I had to supplement with the excess red blocks I had cut and a pieced heart using scraps from the front.  Personally, I really love the back of this one.  The splashes of extra color make me pretty happy.


Originally I wanted to quilt this myself but the size of it was overwhelming to me.  I made the decision and had it long-arm quilted locally.  This is one of the reasons that the quilt took so long to make.  When I got the quilt back I was really unhappy with the quilting.  It was not what we had discussed when I dropped off my quilt, whole blocks were not quilted and the wrong thread color had been used.  At that point I didn't know what to do so the quilt just sat for literally years needing only a binding.  


Finally I decided that it wasn't worth it to take the quilt back and have it re-quilted.  I certainly didn't want to rip all of those stitches out and frankly, didn't trust the long-armer to do it.  So I sucked it up, cut a binding, and finished it in time to gift at our family Thanksgiving this year.  And I'm glad that  I did.  They loved it, even though it was two years late, and were so excited to get a quilt.  And to be honest, I didn't even notice the quilting when I gifted it and I don't notice is now in the pictures either.  I guess I just needed an expectation adjustment.  After all, Finished IS better than Perfect.


Remember that pile of squares that I cut at the beginning?  Some of them became my Sailor's Take Delight quilt that I finished and gifted this summer.  


Friday, November 20, 2015

Jen Goes to Retreat

This October I had the wonderful opportunity to attend a retreat for the first time!  It is sponsored by my local quilt guild and really quite affordable.  The last two years I haven't been able to attend because it actually fell on the weekend we got married and then our one-year anniversary and since I figured my then-fiance/now-husband wouldn't appreciate me missing both of those events to go quilting..... well, you get the idea.  But this year it was the weekend after, and damn it all, I was going!  

I think I brought every WIP I have to retreat to work on and even some soon-to-be-WIPs but did manage to get a lot accomplished.  I started with several mini quilts that I needed to baste/quilt/bind and a block for a sampler raffle quilt for a local charity.


When I was done with the mini's I moved on to binding a large quilt that I'd been putting off for ages.   Jane introduced me to glue basting the binding before I machine quilt it and I am officially now a convert.  I stopped at Keepsake on the way home to get some basting glue for myself.  It made finishing this large quilt off so much easier.  It's a gift that I hope to give at Thanksgiving this year so watch for pictures soon shortly after!


Thursday, October 22, 2015

Simply Mini Swap

Back in August, I think I signed up for my first ever mini quilt swap.  It's entirely managed on Instagram.  You can find it by searching #SimplyMiniSwap for the full group or #SimplyTeamConni for my pool.  For some reason I always seem to miss the sign-ups but I managed to catch this one and it seemed completely doable.  The instructions?  Make a mini quilt.  That's it.  No extras, just a mini quilt.  Well the mailing deadline is this Saturday and I'm embarrassed to say that my partners mini isn't done yet but I'm off to retreat tomorrow for four days and hoping to sew tonight so finishing up shouldn't be a problem. (Don't worry Partner!)

In the meantime I wanted to show you the quilt that I received from Mariah who you can find on Instagram at @Gr8Manythings.  She's an adventurer and nerd like me! Plus she has two seriously cute kids (not like me!!) and she made me the most amazing mini quilt!  It's made up of teeny-tiny flying geese on a grey chambray background.  I LOVE the orange and green ombre geese and the fun pink polka dot binding.  It's backed in a nice bright green polka dot too!  Plus how fun is this little green corner in the bottom?  


I'm so lucky to have received such an awesome quilt and I can't wait to finish up my partners quilt to get it in the mail ASAP!  Thanks for visiting!  Stay tuned for pictures from my first ever retreat this weekend and hopefully lots of newly completed projects.  I'm bringing a long list with me!


I'm linking up with Crazy Mom Quilts for Finish it up Friday.

Thursday, October 15, 2015

Twice as Nice Super-Hero Twin Quilts {two finished quilts}


Wow, it's been a month again...  how did that happen?  So much is happening right now.  Partly because I lost my sewjo again, the change in the seasons and my struggle with seasonal depression (and the loss of light) and an intense desire to watch re-runs of SVU on Netflix and eat cookies, and partially because of work demands and things that need to get finished at home before the snow comes in (winter IS coming).  If you really missed me I have been active on Instagram.  I vow to be more active here in this space moving forward though.  This is important to me and you are too.  I appreciate you taking the time to read my sometimes nonsensical rambling and comment on posts.  I look forward to that interactions with each of you.
Today I want to show you the coordinated twin quilts I recently finished for a co-worker.  I'm calling them my super-hero quilts.  All of the different shades of red, white and blue make me think of Superman, Captain America, and the lot.  I started these back in July and shared the tops with you shortly after as part of the Quilted Living Summer Blog Tour with Fat Quarter Shop.  I made the Freedom quilt and, after a quick email to my coworker to make sure she was on board with the idea, decided to break it up into two smaller quilts for her soon to arrive twin boys.  

I worked from my stash for this one and started with a big stack of bright red/orange, royal blue/navy, and a mismatched pile of low volume gray/cream/white. For backings and binding I used different fabrics for each quilt.  I wanted these quilts to be a matched pair but not matching quilts, that way Momma can tell whose is whose, even if she can't tell who's who.  Right Momma?

One quilt has a solid blue kona backing with a red binding and the other is a fun red-white-blue print with a coordinated blue binding.  I kept the quilting very simple on each quilt, mostly using my walking foot to straight line quilt in coordinated blue, red. and white threads.  I did go back and FMQ some areas as well.  I really love how the quilting shows up on the solid backing by the way! Maybe as I become more confident with my quilting I'll do more of these in the future?

In usual fashion I procrastinated getting these finished until the week before Mommas surprise baby shower at work.  I ended up quilting them over two days and then rushing to get the bindings on the night before.  I did finish in time to give her the quilts but then had to take them back so I could snap some pictures to share with you.  Unfortunately the weather was not cooperative so even the ones I got were not great (sorry).  

I'm really happy with how these came out, even the FMQ, which I usually struggle with.  Momma loves them too and was really happy to get some handmade quilts for her two newest boys. I did make her promise to send me a picture of her new babies on the quilts once they make their debut.  I won't wish them to hurry up but I can't wait to meet them!

I'm linking up with Crazy Mom Quilts for Finish it up Friday.

Friday, June 19, 2015

Sailors Take Delight {A finished Quilt}

I'm so excited!  I had a binding marathon and finished three quilts last night and I can't wait to show you!!  This is the first of the three.  This is also one of the items on my FAL Qtr 2 list so woot for that too!  This quilt has been a WIP since 2012??  I think.  All I know is that the blocks were pieced using a VERY wide seam, pre-my understanding of a quarter inch seam days...


It's made using half-square triangles which are then sewn into quarter-square triangles, finishes at 50" x 42 1/2", and is made up of various red and white tone fabrics which are leftovers from a gift quilt that has yet to be gifted.  All it needs is a binding (apparently that's where I loose steam...).


I'm calling this quilt Sailors Take Delight, after the common ditty:

Red Sky at Night,
Sailors Take Delight.
Red Sky at Morn,
Sailors Take Warn.

The backing is pieced using various strips and leftovers from my stash but includes some amazing bunny fabric called Ric Rac Rabbits by Andover Fabrics.  It's not available anymore which is too bad.  I would definitely add more to my stash.  They are so cute!


I actually quilted this one myself with some help from a fellow Local Quilt Guild member, Ellie.  She was so kind to have me over to her house one day for a lesson on long arm quilting using her machine!  She told me to bring some fabric to practice on and I said, "forget it! Go big or go home!!" and brought two quilts.  We quilted it row by row using a fun flowery petal shape.  Some of the lower rows have double petals too.  It was fun to learn and try and I really look forward to spending some more time with Ellie in the future for more lessons. (THANKS ELLIE! YOU'RE THE BEST!)

You can really see the quilting progression in the backing picture above.  Some of my first flowers are really quite sad but they do get progressively better as you move down the rows.  By the seventh row I had it down but alas, ran out of quilt.


This quilt does not have a designated home yet so I may end up keeping it.  If I do I think it would make a lovely picnic quilt!  Also can we just take a moment to appreciate those lupines in the background of this picture.  They are in full bloom here now!


The quilt is bound in a dark navy solid that I happened to have on hand for one of the quilts I finished last night.  I can't show you that one yet because it's a surprise.  Overall I'm happy with the final results and really proud that I quilted it myself on the long-arm, even though it's far from perfect.  I have been practicing my doodling with pen and paper and hope to translate some of that to fabric soon!


Many thanks to my dad, Mark, for holding the quilt for me in these shots.  I managed to harass him into it after our post-work run this afternoon.  He was a good sport and only complained slightly about his arms being tired, but just couldn't resist a few silly pictures.You can't quite tell from the photo below but he's grinning and giggling in this one being funny.  (THANKS DAD! And check out his cool new kicks!  We're ready to hit the ground running.....pun intended.)


Also I just want to throw out there that I'm 2 followers away from 200 on Instagram.  I think once I hit 200 we'll have to do a giveaway!  Stay tuned for details!  Thanks so much for visiting! See you soon!

Linking up with Finish It Up Friday and Crazy Mom Quilts

and


Friday, February 27, 2015

Churn Dash | a bright and cheery quilt

Every year my girlfriends from school (affectionately nicknamed: The Cupcake Club) get together and have our annual Friendsgiving gathering.  We eat lots of food, paint our nails, apply face masks, adventure about, drink lots of wine, and do a Yankee Swap or Secret Santa.

This year I brought this fun quilt for our Yankee Swap.  When I started it I had dreams of making it massively large and keeping it for myself.  But I found it sitting in a WIP pile after several years and that changed.  Rather than making another 20 blocks or so, I decided to finish it as is and gift it to a friend.


It is a basic churn dash quilt using various blues, yellows, and grays from my stash.  It was one of the first projects I started working on when I came back to quilting.  I can tell because all of my seams are between 3/8" and 1/2" wide!  This was before the light bulb moment of perfect 1/4 seams.  The quilt finishes at about 45" square and is backed in a fun blue and white plaid.  I quilted it using my walking foot and what I'll call "organic straight line quilting."  It is bound using a soft blue polka dot, also from my stash.


The Quilt in it's new home.

My friend A. got to keep the quilt and I'm so glad.  It suits her personality perfectly!  She is a kindergarten teacher and a generally cheerful, happy person!  She says things like "aww sugar muffins", loves dancing to Pat Benatar, and is rarely found without a smile on her face.  The quilt fits in perfectly in her living room.  Though, I'm not sure which came first, the quilt or the yellow pillows!

I hope you enjoy cuddling with this quilt pretty lady!


Happy Girl, Happy Quilt.


Linking up with Finish It Up Friday and Crazy Mom Quilts!

Friday, February 6, 2015

Currently Nameless | A Finished Mini-Quilt

Every two years my local quilt guild holds a quilt show to exhibit our work and help raise money for our guild sponsored activities.  Our next show is this spring: Saturday, April 18th and Sunday, April 19th.

One of the ways that we help to raise money is by holding a mini-quilt silent auction.  Guild members are asked to donate mini-quilts through out the months leading up to the show and then we hold two separate auctions, one on Saturday and one on Sunday.  Well I've been trying to work up some mini's to donate and had time to finish one up on Monday night.

When I was making my Crown of Thorns blocks this month, I ended up with a bunch of leftover HST and I decided to make up a mini using them.  I laid them out randomly at first and snapped a quick B&W picture to see how the values looked.  I wasn't in love.  But I did notice how strongly those darker values stood out.  I went back to rearranging...

layout option 1

In the end I really liked this layout.  The left side is a little washed out from my lamp in the picture below but you get the point...it's fun right?!  

layout option 2

I had to cut a few more background squares to finish off the design like I pictured it but it was worth the extra effort in the end.


Finished Mini

I tried my hand at match stick quilting in the background using a beige-y colored thread and left the colored areas un-quilted.   I've no idea what the brand is.  I like the texture it gives the quilt and that it really makes the colored squares pop off the wall.  I used scraps from the top to make the binding and thought it would be fun to throw in a few colorful bits.  I didn't space them very well because the purple bit got lost in a corner but I still like the overall effect.

Quilting detail

The mini finished at 17" square and has fast triangle backs for hanging with a dowel.  I absolutely love the mini and brought it with me to work this morning so I could admire it for a few days before it goes off to the mini-quilt donation pile next week.  Now I just need to name it.  Any suggestions?

If you're in the New England area and want a chance at this mini you'll have to come and visit us at the quilt show Saturday, April 18th and Sunday, April 19th in Lebanon, NH!  Who knows?  Maybe I'll try to buy it back for myself!

Linking up with Finish It Up Friday and Crazy Mom Quilts!